|
There are two speech recognition tools available in Praat: automatic transcription (turning speech into text) and automatic speaker diarization (finding out who speaks when). This tutorial describes how you can use these tools in Praat. It assumes that you are familiar with the Intro, especially with Intro 7. Annotation.
Transcription is performed with whisper.cpp and it requires at least one external model installed on your computer; diarization is performed with an adapted pyannote.audio diarization pipeline and it works without any external models. Diarization can also be performed together with transcription, so that transcribed text is divided between speakers.
After you have read the chapters 1. Automatic transcription and 2. Automatic speaker diarization, you might be interested in what can be done to improve the performance of these tools in Praat; you can find this information in 3. Performance.
Transcription in Praat turns speech in a Sound object into written text. Usually you might want this text to be placed into a TextGrid, aligning it with the Sound (this is described in 1.2. Transcribing into a TextGrid). But you can also obtain it as plain text (see 1.3. Transcribing into plain text). Either way, you first need a Whisper model installed, and how to do that is explained in 1.1. Installing Whisper models.
To transcribe, you need at least one Whisper model installed. In this case, installation means downloading a model and placing it into a specific folder on your computer, where Praat can later find it. In your Praat preferences folder, create a folder called models, and inside it another one called whispercpp. If you are on Windows, you will now have a folder called something like C:\Users\Your Name\Praat\models\whispercpp.
Models can be downloaded from https://huggingface.co/ggerganov/whisper.cpp. This page contains Whisper models in ggml format (files with extension .bin), which is what whisper.cpp uses. Note that the original Whisper models, by OpenAI, are distributed in PyTorch format (files with extension .pt) and cannot be used in Praat directly: they first need to be converted to ggml format. The files on the page above are results of such conversions.
The list of available models is quite long, and you might wonder how to choose one. You will probably want to experiment with different models to find a good balance between speed and accuracy for your specific task, but below you can read a brief overview which can help you get started.
A model is English-only if its name contains .en (e.g. ggml-small.en.bin); all other models are multilingual. Size-wise, the models range from tiny (about 75 MB) through base, small and medium to large (about 2.9 GB). The large models have three different versions: large-v1, large-v2 and large-v3. The later versions are improvements over the earlier ones. Generally speaking, larger models tend to be more accurate but use more disk space and memory, and take longer to transcribe. So, base or small can be good starting points.
Models whose names end in -q5_0, -q5_1 or -q8_0 are quantized: their weights are stored with fewer bits (5 or 8 instead of 16), so they take less disk space and memory, and run faster than the normal (non-quantized) models with the corresponding names. There is also large-v3-turbo, a reduced version of large-v3 that has fewer decoder layers: it is about half the size and thus faster than the original large-v3. These optimized model variants were created to offer better speed at the cost of reduced accuracy.
Once you have decided which model you want, download its .bin file and place it in your newly created whispercpp folder. Any .bin file placed in this folder will be found by Praat. In fact, if you want to experiment with different models, you can download as many of them as you like; Praat will let you select one before you start transcription.
You need a Sound and a TextGrid for this Sound (transcription modifies an existing TextGrid; it does not create one). The TextGrid should have at least one interval tier: transcription is run on one selected interval, so you need an interval tier to contain this interval. To transcribe the whole Sound, you can use an interval tier without internal boundaries and thus consisting of only one interval spanning the whole Sound (interval 1).
There are two ways to start transcription into a TextGrid:
These two ways achieve exactly the same result, and which one you use is a matter of preference. They differ only in how you select the interval you want to transcribe (see 1.2.4. Transcribe!), and whether the configured transcription settings are persistent across Praat sessions (see the next two paragraphs).
To perform transcription from the TextGridEditor, you first need to adjust the settings via the separate command Transcription settings... (in the Interval menu). These settings are preserved across transcription runs and across Praat sessions, so you can skip this step later when you want to reuse the settings from the last time you transcribed. Note that the settings in the Diarization... block can also be configured via Diarization settings... (also in the Interval menu), which is used by standalone diarization (see 2. Automatic speaker diarization). This means that a change in diarization settings made in either place affects both transcription-with-diarization and standalone diarization.
If you are running transcription from the Objects window, all the transcription settings appear in the Transcribe interval... command window. In this window, settings are preserved across transcription runs but not across Praat sessions.
There are three blocks of settings: Transcription..., Non-speech detection... and Diarization.... The last two configure optional steps in the transcription process; each step can be switched on and off by the first setting in its block.
The Transcription... block has three settings: Whisper model, Language and Include words.
Whisper model lists all the models you installed in 1.1. Installing Whisper models; now is the time to choose the model that you want to use. If you find yourself at this step with an empty model list, this means something went wrong at the installation step. You can go back to 1.1. Installing Whisper models to check that the downloaded model(s) are placed in the proper folder. After that, reopen Transcription settings...; your installed model(s) will appear in the list.
Language is the language you want to recognize; you can select it from the list of all available languages or keep the default Autodetect language (note that for an English-only model you are not allowed to select a language other than English or the default Autodetect language).
The third transcription setting is Include words. If this setting is on, an extra tier is added to the TextGrid below the sentence tier, with one interval per word. If diarization is also included (described below), each speaker gets their own word tier. Examples 2 and 4 below show the resulting TextGrids when Include words is on without and with diarization respectively.
Non-speech detection... is switched on and off by its first setting Detect non-speech: when it is on, the non-speech parts are first removed from the Sound, before it is passed to a Whisper model. This both speeds up transcription and prevents the model from inventing text in the non-speech parts. Another benefit of using non-speech detection is that it makes sentence and word boundaries more precise; without it, the text might be stretched over the silent parts of the Sound. See speech activity detection with Silero VAD for the description of the settings influencing non-speech detection.
Diarization... is switched on and off by its first setting Include diarization: when it is on, diarization is also run on the Sound (independently of transcription). The results from both transcription and diarization are then combined: transcribed text is divided between the detected speakers. See speaker diarization with adapted pyannote.audio and 2.2 How to configure settings for the description of the diarization settings.
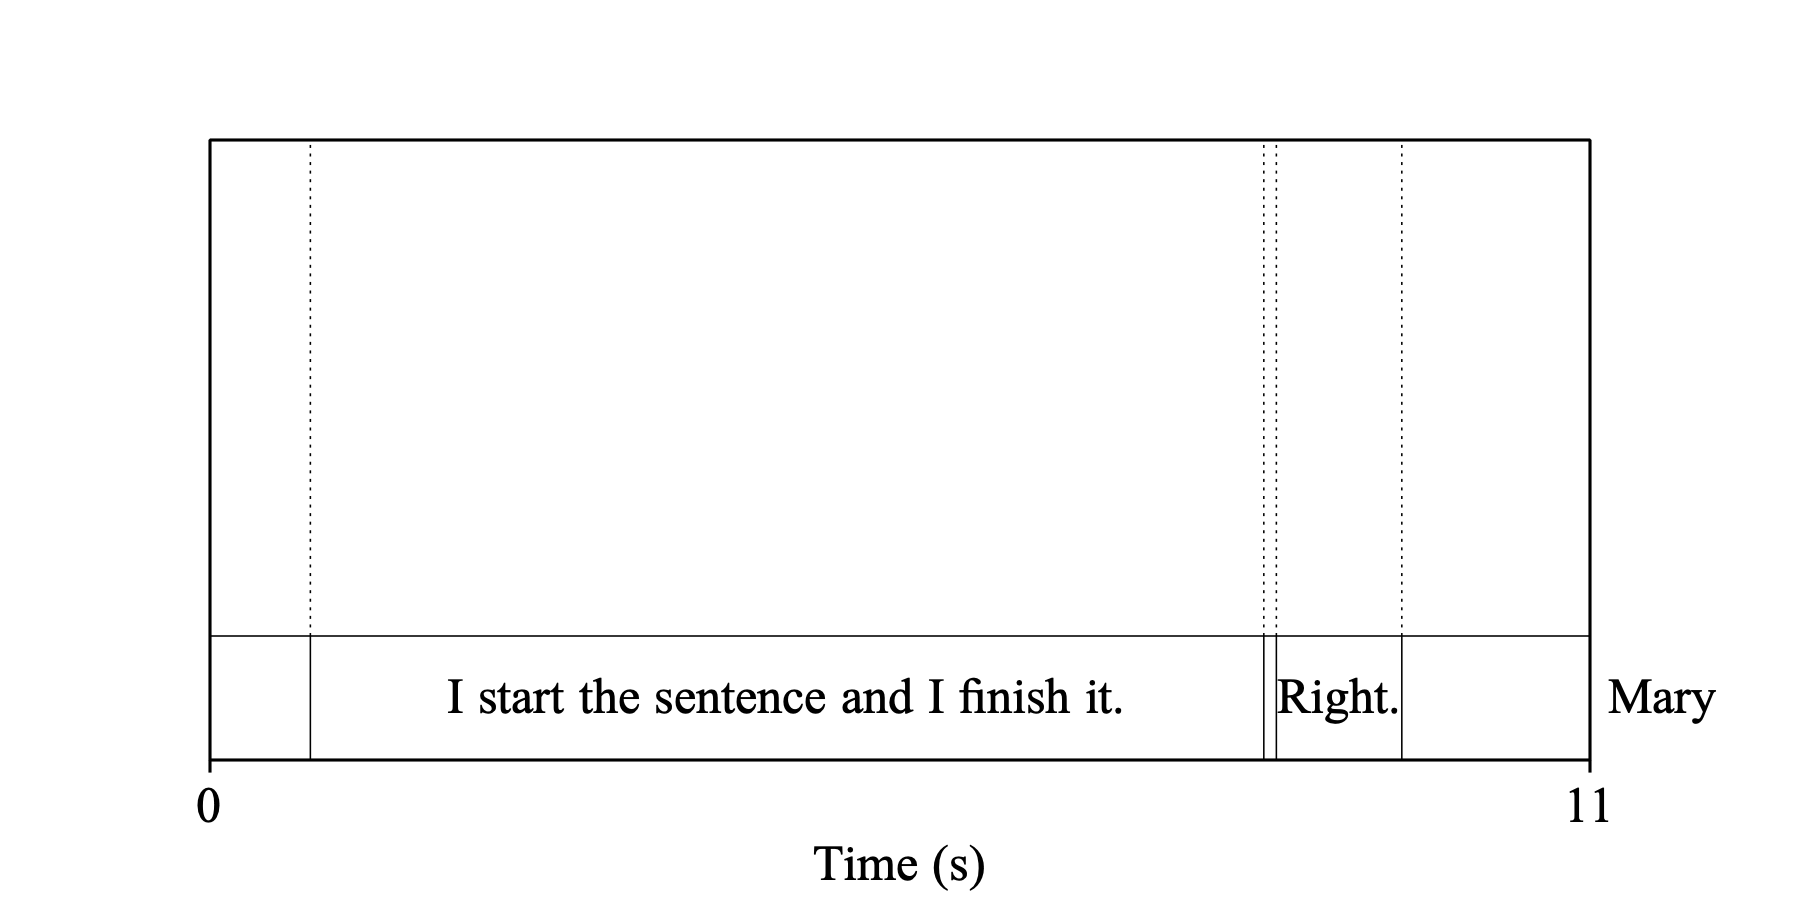
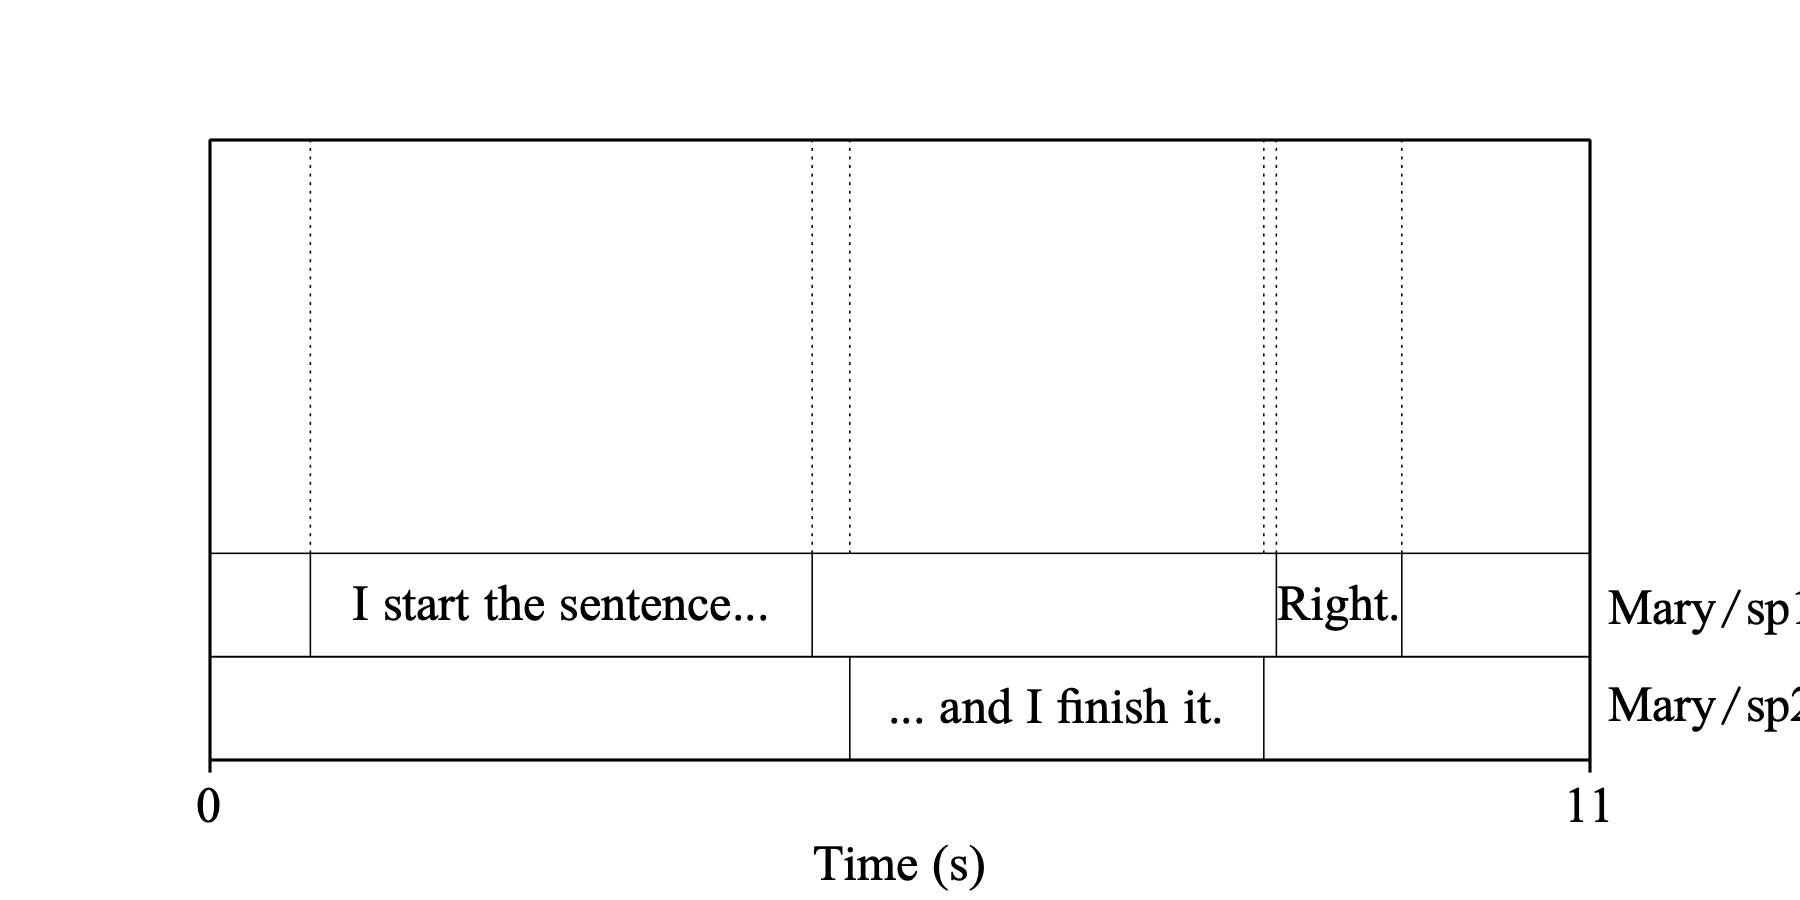
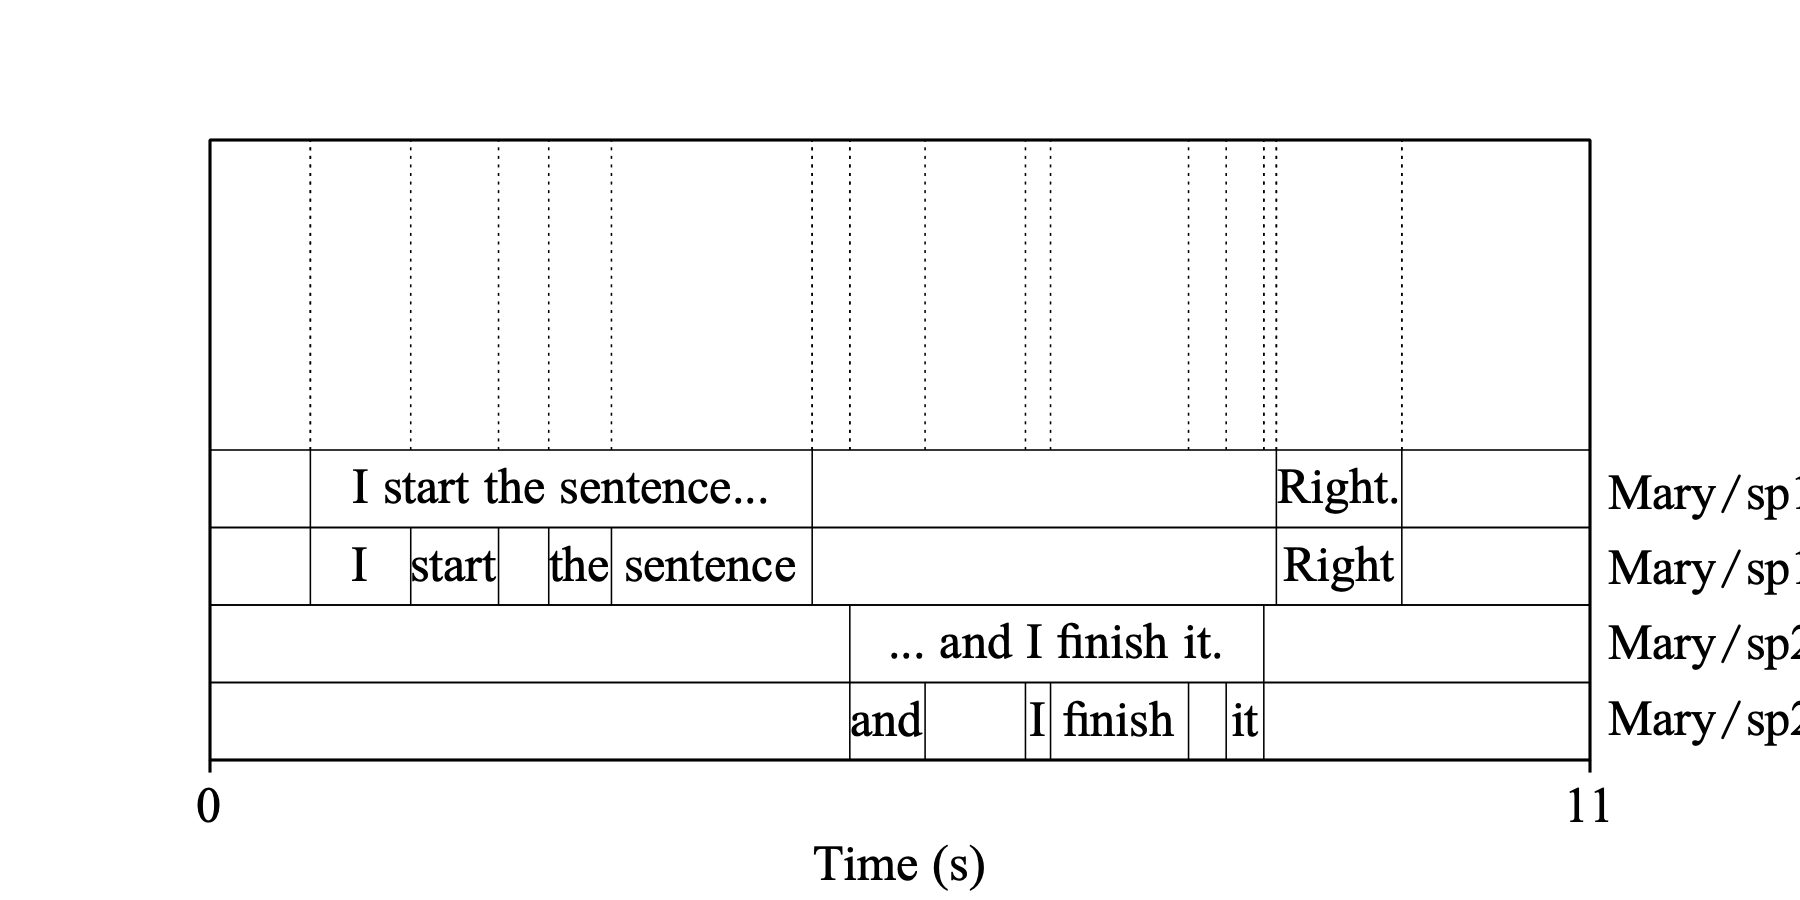
The structure of the resulting TextGrid depends on the combination of Include words and Include diarization settings. Four examples below show the different TextGrid outcomes for different combinations of these two settings when the interval selected for transcription spans the whole tier “Mary”.
Example 1: both Include words and Include diarization are off. The interval selected for transcription is split into many intervals: one interval for each sentence containing the sentence text, with empty intervals for non-speech parts. Sentence boundaries are defined by the punctuation that whisper.cpp returns. No new tiers are inserted.
Example 2: Include words is on and Include diarization is off. The original interval is split into sentences as in Example 1, plus a tier called “Mary/word” is added just below “Mary”, with one interval per word.

Example 3: Include words is off and Include diarization is on (and diarization detects at least two speakers). Tier “Mary” is renamed to “Mary/sp1” and additional tiers “Mary/sp2”, “Mary/sp3”, ... are added, one tier per detected speaker. Each speaker’s tier contains the intervals with the sentences spoken by that speaker. It is possible that a sentence is started by one speaker and finished by another one. In this case the sentence is split between these speakers’ tiers.
Example 4: both Include words and Include diarization are on. In addition to a sentence tier, each speaker also gets a word tier (“Mary/sp1/w” for speaker 1, “Mary/sp2/w” for speaker 2, ...), which is inserted directly after their sentence tier.
With the transcription settings configured, you are now ready to start the transcription.
If you are transcribing from the TextGridEditor, select the interval you want to transcribe by clicking on it and choose Transcribe interval from the Interval menu.
If you are transcribing from the Objects window, use the settings Tier number and Interval number at the top of the Transcribe interval... command window to specify the interval you want to transcribe.
In either case, note that you cannot transcribe an interval belonging to a tier whose name already contains a slash. This is to prevent endlessly growing names of the derived tiers.
Running transcription takes some time; how long it takes depends on the length of the selected interval, the Whisper model, and whether diarization is included. Please read 3. Performance if you would like to make transcription run faster.
You can also transcribe a whole Sound into plain text. For this you need a SpeechRecognizer object. You can create one by choosing Create SpeechRecognizer... from the New menu in the Objects window. A command window will appear containing two settings: Whisper model and Language, both of which are described in 1.2.2. How to configure settings. After you click OK, you will find a new SpeechRecognizer object in the object list.
To transcribe, select the SpeechRecognizer object and the Sound object together and choose SpeechRecognizer & Sound: Transcribe from the Dynamic menu. The result of transcription will be written to the Info window. Note that the Detect non-speech setting is not available here: Silero VAD is always on, with default settings.
Diarization in Praat detects different speakers in a Sound. For each detected speaker, it identifies speech segments, which are time intervals during which this speaker is active. Diarization can be done as part of transcription or standalone. In either case, it modifies an existing TextGrid, producing one interval tier for each detected speaker.
Diarization settings (see 2.2. How to configure settings) are shared between standalone diarization and diarization as part of transcription. Everything else in this chapter is specific to standalone diarization; the transcription-with-diarization case is described in 1.2. Transcribing into a TextGrid.
To perform diarization, you need a Sound and a TextGrid for this Sound (diarization modifies an existing TextGrid; it does not create one). The TextGrid should have at least one interval tier: diarization is run on one selected interval, so you need an interval tier to contain this interval. To diarize the whole Sound, you can use an interval tier without internal boundaries and thus consisting of only one interval spanning the whole Sound (interval 1).
There are two ways to start diarization:
These two ways achieve exactly the same result, and which one you use is a matter of preference. They differ only in how you select the interval you want to diarize (see 2.4. Diarize!), and whether the configured diarization settings are persistent across Praat sessions (see the next two paragraphs).
To perform diarization from the TextGridEditor, you first need to adjust the settings via the separate command Diarization settings... (in the Interval menu). These settings are preserved across diarization runs and across Praat sessions, so you can skip this step later when you want to reuse the settings from your last diarization run. Note that the diarization settings are shared between standalone diarization and transcription-with-diarization. So if you last changed them via Transcription settings..., it is worth checking them before you run diarization.
If you are running diarization from the Objects window, all the diarization settings appear in the Diarize interval... command window. In this window, settings are preserved across diarization runs but not across Praat sessions.
Non-speech interval label and Speech interval label are the labels in the resulting TextGrid assigned to intervals classified as non-speech and speech respectively. These two settings only influence the visual appearance of the result of diarization but not the result itself.
Max. number of speakers (≥ 2) and Clustering threshold (0-2) both influence how many speakers diarization detects. Max. number of speakers (≥ 2) defines an upper limit on the number of detected speakers, and while there is no equivalent setting for the lower limit, Clustering threshold (0-2) can be used to push this number up. These two settings can be used to improve the quality of diarization if you know exactly how many speakers are in your Sound. If this is the case, you might find the following recipe useful:
Repeat steps 2 and 3 until diarization detects the correct number of speakers.
Tweaking the Clustering threshold (0-2) might especially help when the voices of the speakers are similar, or when recording is done in a noisy environment. If you would like to know the details of what clustering threshold is and why it works this way, please read the Algorithm section of speaker diarization with adapted pyannote.audio, specifically the part about Clustering.
The Allow speakers to overlap setting does what its name suggests: if it is on, diarization can detect when two speakers are speaking at the same time. Note that diarization does not detect overlap of three or more speakers.
The last setting, Segmentation step (0-1), can be used to find a balance between speed and accuracy. You can read more about it in 3. Performance. To start with, you can keep its standard value of 0.1.
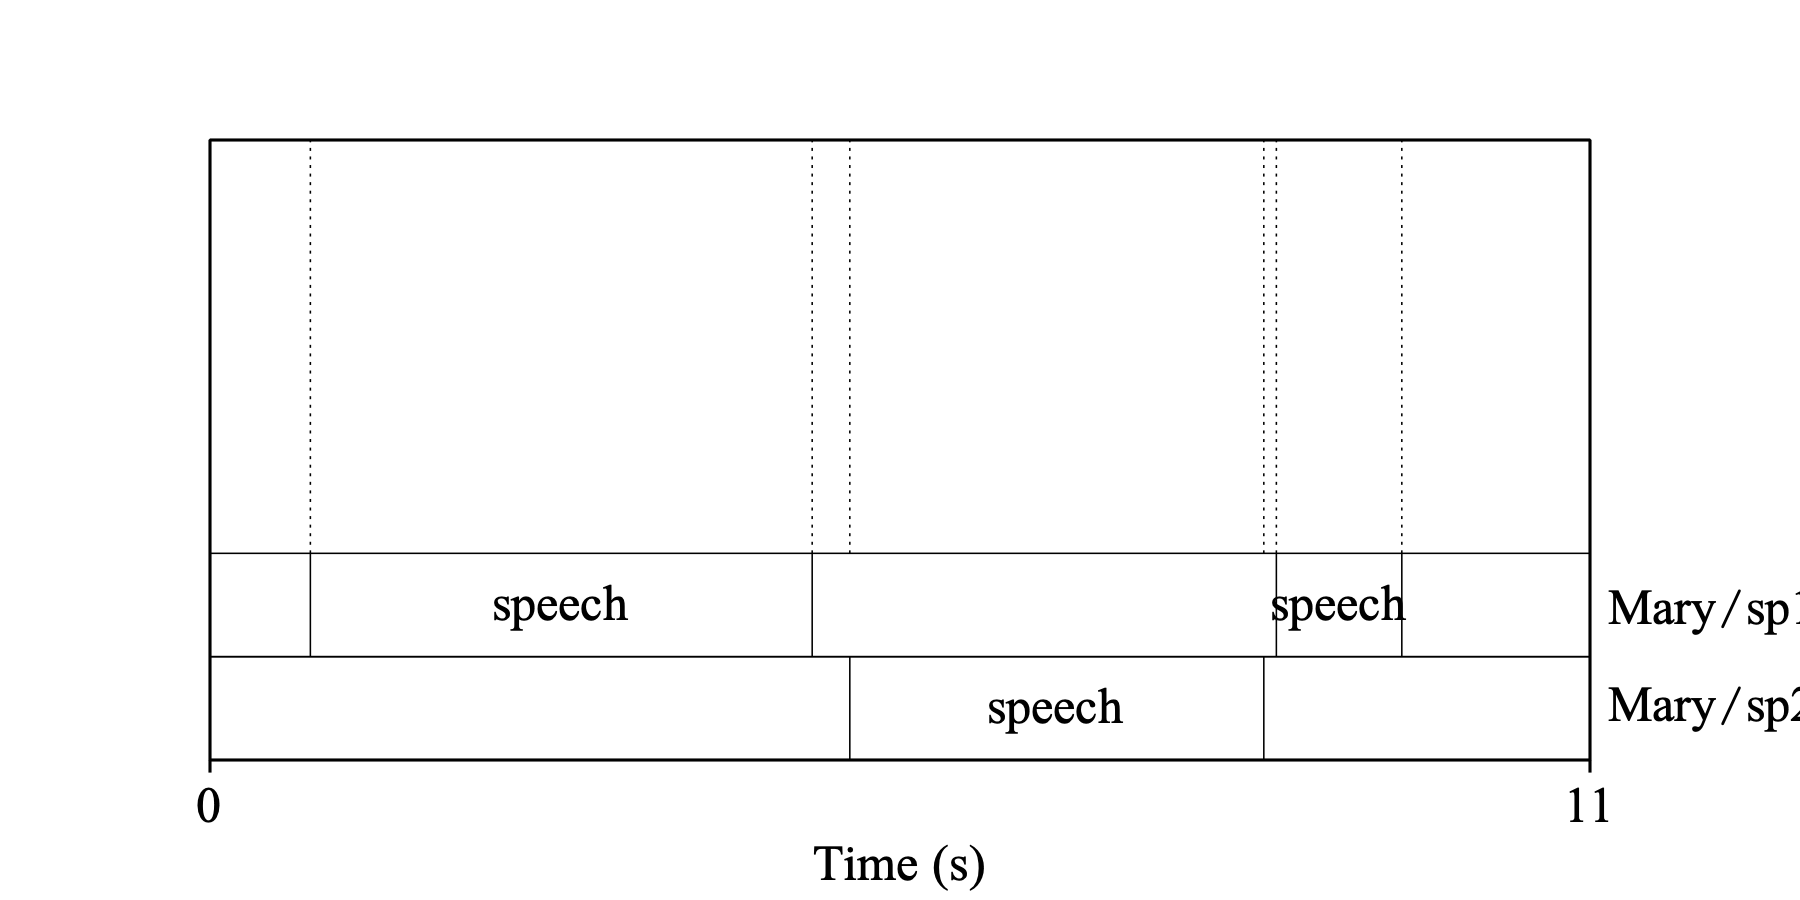
This example shows the result of a standalone diarization run on the same Sound as in 1.2.3. Examples; the interval selected for diarization spans the whole tier “Mary”. Diarization detects two speakers, so tier “Mary” is renamed to “Mary/sp1”, and the second tier “Mary/sp2” is added. Each speaker’s tier contains alternating intervals: non-speech and speech intervals labelled with the configured Non-speech interval label (blank in this case) and Speech interval label (“speech” in this case), respectively.
With the diarization settings configured, you are now ready to start the diarization.
If you are diarizing from the TextGridEditor, select the interval you want to diarize by clicking on it and choose Diarize interval from the Interval menu.
If you are diarizing from the Objects window, use the settings Tier number and Interval number at the top of the Diarize interval... command window to specify the interval you want to diarize.
In either case, note that you cannot diarize an interval belonging to a tier whose name already contains a slash. This is to prevent endlessly growing names of the derived tiers.
Running diarization takes some time; how long it takes depends on the length of the selected interval and on the diarization settings. Please read 3. Performance if you would like to make diarization run faster.
Speech recognition tools in Praat rely on neural models, which consume a lot of computational resources. So the time spent on transcription and diarization might become an obstacle to using them, especially if you need to analyse a corpus or a large set of recordings. This chapter offers some advice on how you can try to make speech recognition tools run faster.
Most modern computers have several physical processors. Each physical processor can process one or two threads that run computations in parallel. The number of threads that a computer can run in parallel is the number of its logical processors.
A reasonable assumption would be that transcription and diarization run fastest when Praat uses as many threads as the computer has logical processors. However, in practice, using that many threads can cause a dramatic slowdown on some computers. The question is then: exactly how many threads is best to use? Unfortunately, the answer depends on the computer’s hardware architecture in ways that are difficult to predict in advance. But it appears from our tests that half of the available logical processors is a safe starting point that avoids the worst slowdowns, so this is the default Praat uses for both transcription and diarization. If you suspect that this default is not optimal for your computer, or if you would like to experiment, you can change it in AI settings..., which you can find in the Settings submenu of the Praat menu. But keep in mind that it is probably better not to use more threads than the number of logical processors your computer has.
The optimal number of threads can differ between transcription and diarization, because they use different models and parallelize their work in different ways. So it is better to tune them separately:
The choice of Whisper model has a strong influence on how long transcription takes. If your transcription is too slow, you can try to switch to a smaller or a quantized model. You can read more about available models in 1.1. Installing Whisper models.
Switching on Detect non-speech (see 1.2.2. How to configure settings) also speeds up transcription, especially on a Sound that contains a lot of parts without speech. This is because non-speech parts are removed before the Sound is passed to a Whisper model, making the sound that is actually analysed shorter. This is the setting which you may want to have always on, because it also improves accuracy of the detected word and sentence boundaries.
If you use transcription with diarization (Include diarization setting is on), then the overall time also depends on how fast diarization is.
The Segmentation step (0-1) setting (described in detail in speaker diarization with adapted pyannote.audio) controls the overlap between successive 10-second analysis windows and therefore the overall number of analysis windows that the segmentation model processes. The segmentation step itself is a distance between the starts of two consecutive windows as a fraction of the window length, but the smaller this distance, the bigger the overlap.
For example, a segmentation step of 0.1 makes this distance 1 second, so that two consecutive windows have a 90% overlap. Doubling the step value to 0.2 reduces the overlap to 80% and halves the overall number of analysis windows the model has to process; as a result diarization runs roughly twice as fast. Increasing the step value to 0.5 further reduces the analysis window overlap, making diarization run approximately five times faster.
But the price for this speedup is reduced accuracy. After processing all analysis windows, the diarization algorithm reconstructs the result for the whole Sound by averaging the model’s predictions across the all the analysis windows. Less window overlap means averaging across fewer windows, which produces less accurate results.
If you want to speed up your diarization, you may experiment with increasing this value. But perhaps it’s best to keep it below 0.5 so that every moment in the sound is analysed at least in two analysis windows.
© Anastasia Shchupak 2026-06-01